an(e)vil

My photo
Existentialism-- Just a bloody good excuse to go riding...
Showing posts with label Adjustable-seatpost. Show all posts

Saturday, February 1, 2014

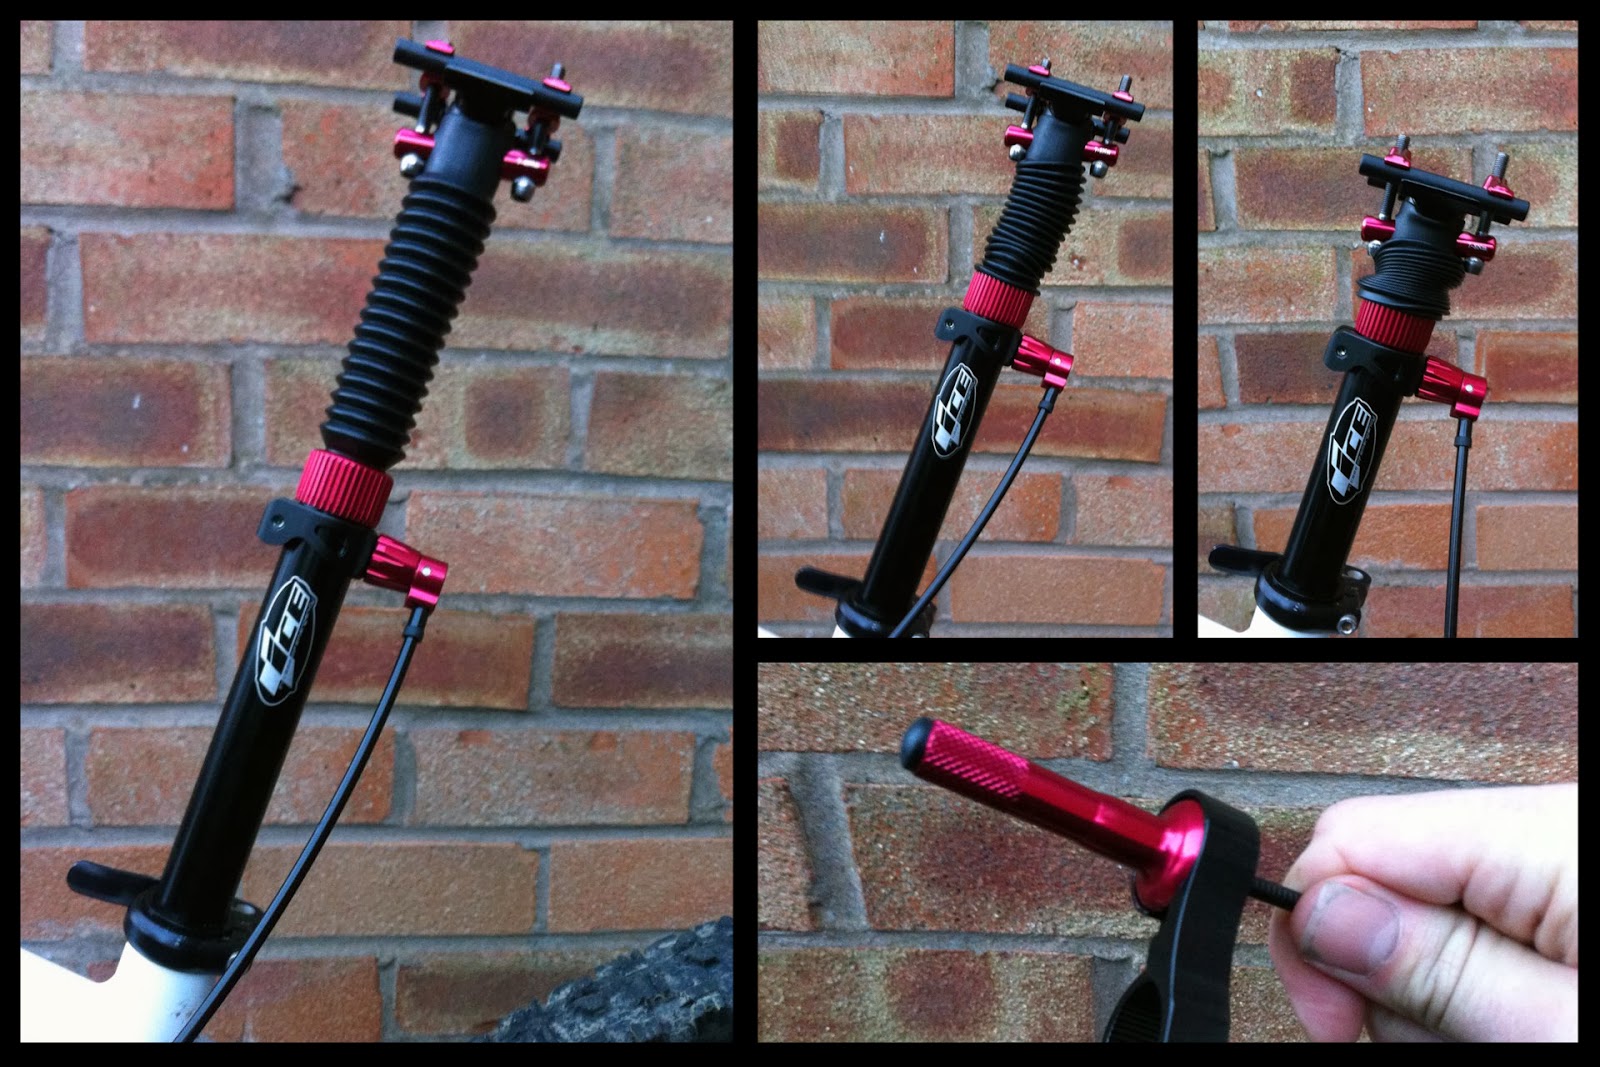
GD Dork Guard

F%^k -- $300+ just went down the drain. The 27.2 KS LEV blew its wad inside my seatpost on last Sun ride with Mr Zero-Point One Ton. Bits of it still stuck in TUFA's seat tube...


Whether it can be repaired or warrantied.. I still need an adjustable seatpost for now. Dragging out my "open grave" groundsheet of too lazy to keep away parts... its time to resurrect the Gravity Dorkper.. errm I mean Dropper.

It somehow wasn't working well after last pulling it apart to service.. OK stupid me.. found the reason today... collar was on too tight and a bit too much grease... making the magnetic pin just stick a little too much.


Been bone dry the last 2 weeks as rainy monsoon season seems to be finally over. I could never get over the look of the boot protection on the GD. Many people have simply removed it and rode without problem elsewhere. But here with half the year mired in mud.. I just didn't think it can last long enough between scheduled full servicing of the post.

Guess what I needed is a quick release guard while out on muddy trail rides...

So... its time for another simple Reduce Reuse and Recycle DIY...
1 side- Old fork boot (fark I think those belong to the Jurassic era of my mtb days)
1 Piece of plastic saddle rail retainer from a saddle's packaging (who would have kept such things!)
1 cable tie (indispensible.. even our world class transportation, SMRT swears by them)
1 velcro (optional)


Now that certainly up the dork factor over the original accordion ugliness by a factor of 10. Thing is it can be removed in 1 sec without the optional piece of velcro as a secondary securing over the GD collar.
 ---

In retrospect, after the LEV busted, I'm more or less convinced that when it comes to 27.2mm droppers... those infinite travel hydraulic-pneumatic ones have too many constraints limiting their usefulness. Most manufacturer that came out with this size (and not many) limit the travel to 100mm while their other models can can another 25-50mm more. And this size was also seen as the one that was promised and then pulled off the shelf. Some like the LEV eventually made it.. some simply disappeared from the news altogether. One of the reason is to cram all those parts in leaves very little room for the air chamber pressure. Reducing the size of the piston/ stanchion will add back the necessary volume for the air chamber, hence most are max out at a shorter travel of 100mm.

Even with all that compensation, the 27.2mm model are somewhat different from the rest of the lineup. In the case of the LEV-- there is no external air adjust valve like its 30.9 and 31.6 counterparts.

One common problem that 27.2 non mechanical post suffer or what many have feedback is a rather sluggish return. I believe this stems again from the volume of the air chamber. While reducing the travel has allow for sufficient volume but it probably doesn't gel well with being pumped to higher pressure, risking having all the parts blowing all over. Well mine still did and yes it was a lot more sluggish with no means of adjusting compared to the 30.9 I have on another bike or compared to my DSP Big Horn and previous KS i950.  Anyway will open up the busted post to take a look at the innards later on and see if my deduction so far is correct.

Back to mechanical... search the latest and some more obscure ones.. well, there is this one called ICE Lift V8. First off it uses a modified version of adj dropper remotes that is my fav... except much like GD, the knobbed end of the shifter cable reside in the post leaving the other end needing some kind of setscrew thing-a-ling to do the job.

pic from http://wideopenmag.co.uk/news/17106/first-look-ice-lift-v8-mechanical-dropper


Like the fact that it has 3 position which my aging GD doesn't. Price is really good too. Cheaper than most...

Not likely that I will swipe the plastic again since the GD is working-- but certainly I would want to hunt down one of those remote or at least DIY again since I have a spare one from Xfusion Hi-Lo that just need to see how to cram a set screw in...

Sunday, September 30, 2012

Review: KS LEV


UPDATE 10/10/12 : Had something to edit and update on the installation section. I don't want to be responsibile for botching up someone's expensive investment if they should be reading this while doing their post installation)

About time for another adjustable seatpost review and finally got my hands on a LEV, thanks to Eugene from GHC.

From testing various ones in the market, I was betting my coin this would be "the post". Right out of the box, the sleek black on black lazer etched logo makes me feel the moolahs that went into this was all well worth...   'Nuff of the wincing and justifications... 


"THE post"?

There is no problem free adjustable seatpost. Period.

Some swear by one or the other but each will have end users reporting issues over time. It boils down to a matter of degree- some are outright failures that should never have even left the drawing board. Others may have a couple of areas like bushing tolerance etc overlooked. A key point for me is how a company responds to issues to resolve it.

While having their fair share of problems, KS seems pretty on top of the adjustable post game. Continually revising and improving their products with changes that shows actual improvement from listening to users feedback.

More importantly there is finally a post that addresses the cable positioning plaguing pretty much all hydraulic posts in the market now, saved for the few that uses one with frames that provide internal routing. Personally I don't see that as something every frame manufacturer will follow. The scope therefore for those kind of internal routing post is limited.

But with the LEV it means no more excess cable bowing or rubbing every which way on your frame when lowered. Yes its probably old news to write this by now.. but its pretty much "the whole point"! It might seem opiniated but anyone coming out with another new post now that doesn't resolve this is basically just positioning their product in second tier.


Running thru the externals...

Weight
Complete package with uncut cables for a 5" drop post at a competitive weight of 571gm.

Clamping
A critical area which always gets my attention. The whole clump of bits and pieces in this area has to deal with one's entire weight from butt up. Constantly subjected to forces in all directions when riding and of course those less than stellar moments when you come crashing down on the saddle after air time. It's one reason why I have religiously avoided weight weenie posts (be it adjustable or not) using ridiculous weight shaving designs and bolts that's probably as strong as bean sprouts.

KS has experimented with quite a few designs. From the single bolt with a spring between the 2 clamping plates in early i900 to the somewhat awkward off-set plates with opposing side screws in the i950. Having owned both I can say they clamp well and tight to seat rails, though adjustment is a little quirky for the latter.

No complaints here. They pretty much nailed it with the clamp design on the LEV. Opposing screws front and back to hold things down works as proven in many other seat posts. Bolts are the right size for strength consideration in this area. While it isn't new but the acutely cambered bolts when locked down with half-dome nuts on fitting curvatures in the top clamp plates makes it a breeze to adjust seat tilt angle. On this aspect, it is much better than any of their other post or for that matter many other competing products out there.

Due to the cambering that leaves tons of clearance for the hex key when tightening.. there's no accidental knocking into the post or having to repeatedly move the hex key in and out while tightening. Another little nice touch.

It just remains to see if feedback from some users regarding trouble with the bolts working loose will happen with mine... From the looks of things.. I say don't grease anything here and it should be fine. Hope I won't have to eat my words to say here that the clamping would stand up to some punishing butt thumping over time..


Bottom clamp sits over and protecting the air-adjustment chamber valve. Neatly packaged.


Not stripping anything more beyond this since everything once mounted and installed was working fine...

Bottom section of post has a warning not to remove until user has seen a video on KS website.

Sounds good to me as that says they do not treat end consumers as idiots where everything has to be sent back to the factory or comes with the usual "only to be open/serviced by authorized dealer" crap.


Minimum Exposed Height (for 5" post)
Bit of trivia for the inseam-challenged.
Distance from max insertion to center of seat rail width.. 7.25".


Installation

It was a strange looking bag of small odd looking bits for the actuation section.. reading the well written instructions, it's easy to follow the logic of how things work when these are stringed together.

Exhibiting my usual paranoia, I have modded to make things work smoother and hopefully last a little longer.

The hooked plastic piece seems to be rubbing on an open ended cable housing as pictured in the instruction. Exposed end in the housing!. Hmmm, that didnt make much sense. (please see UPDATE below)

Even when capped, the surfaces of the 2 plastic ends would be rubbing each other and wear out eventually.. with an odd shape piece like this-- getting a replacement will probably pose some inconvenience.

A sliver of delrin would probably be better but not having any... I added a very thin piece of washer in between. This lets things slide around a little, smooth but doesn't affect the actuation in any way. Pushing it down-- it's  makes lubing the inner from this end easy as well.

The inside of the actuation box is rather simple. Basically the claw piece will pull the bar down and the tension comes from the spring below it.

One of the point touted for the LEV apart from the lowered cable positioning is that it is easy to remove the cable and you can take the post with you if you ever have to lock the bike somewhere.

Fidgeting with the whole stringed-up bits while trying to press the spring down to remove or put it in isn't exactly a breeze. Still it is a good thing if you should ever need to do so without removing levers and all.

However with this compact enclosed actuation box, it would eliminate one problem..  stuck post due to contaminated cable and the actuation area in their other models... With the LEV there really isn't much chances of grit plugging up to render the post inoperable.


A word on the installation.
Instruction booklet says to leave 22mm of inner cable longer than the housing. Cut to that length, insert and tighten the set screw.

Looping everything together, I measured and measured many times over.. no way the 22mm was gonna be enough such that you can still squeeze everything down to snap the bits inside the actuation box without a volley of expletives.

The final length I decided on was 27-28mm. Cut and it took a bit of finger work to tighten without having slack at the remote lever end.

In retrospect it would probably have been easier to just leave the inner and snip off with a clipper after the setscrew has been tightened up...

SO take it from me.... DO NOT CUT THE INNER CABLE but install all the small parts and check the spring tension.. when everything is ok, snip off excess inner cable.


IMPORTANT: If you are trying to install while reading all the above... please finish reading  below.

(Updated)
Was tipped off from a reader and realized I had it installed wrong! -- The hook plastic piece is actually the ferrule meant to fit into the actuation area! The extraneous bit (the "hook") is fills up the gap at the bottom of tha actuation box after the whole ferrule has been fitted in.

Still wondering (and kicking myself) how in the world couldthat have been missed. Damn!

Finally gotten everything the way it should. But quite frankly-- the "wrong" way I had earlier was a lot easier to get the cable tension right with with non-stock remote in use and to fit things in.  So instead of deleting-- I have just strike out those descriptions for now.

Yes yes for all the adjustable post fanatics there--You know what I'm talking about. That irritating 1-2mm slack that you can never quite get rid of when installing these things which is all the amount ever needed to make the damn post not work or feel sloppy)

Anyway that hooked ferrule was pretty much toast after all the mawing it gotten. The material (probably LDPE) has a hardness of cheese literally. A normal and slightly longer ferrule is now doing a job better holding things in place. Only setback is the gap for the inner cable to go through is left "unfilled" 


The correct orientation but sadly the funny ferrule is reaching its terminal stage... RIP

Replaced with a normal shifter-housing ferrule. As an afterthought-- those rigid aluminium ones might have been better. But after a 1 hr battle offighting with these bits.. will do that for next time...

A final check this morning before work and a clearer pic to make sure everything is "A" OK.

Remote Lever...
Guess it works for most people as the design has not been changed at all except for the "upgraded" carbon thumb knob over the alloy one of the i950. While not doubting that it works just as well, however its not to my liking.

For one, the activation is fixed and it means needing to use an ODI compatible grip for the lock-ring. Two...if  like me, with short fingers, ergonomics sucks as it requires finger leaving brake lever when activating the post or an over arched thumb to operate the lever.

In summary, it's just excessive hand/ finger movements. The angle of the cable exiting the remote is awkward, even with a vee brake noodles or using one those soft bendy housing sections... it just leaves too much of a cluttered look than I would care for.  Lastly the whole contraption juts out in a weird angle when handlebar is turned too much.

If there is one adjustable seatpost I absolutely dislike, I'm not naming it. However the irony is that they have the most versatile and no nonsense remote in my opinion. Thankfully, this works well with many other posts in the market including the LEV.

Aligned with the outgoing cable direction, the lever can be flicked on a 360 degree plane. Push or pull... do whatever strikes your fancy and all with just a tiny flick of the thumb while fingers need not leave the bar/ brake lever. I'll just leave in plain sight what is being referred to.. looks like I'm not the only one having such thoughts too


The Test
Settled for a 30km road ride as there wasn't time to hit the trail after installing and building up the new bike...

Very smooth operation. Someone told me that the internal is basically the same as that of the i950. Seems so and very much to my liking. No getting up to initiate a butt drop to lower the post. On this aspect, its just the typical KS butter smooth light lowering action as with their other models.

Rebound speed was just right but there was no pronounced indent or sound to signal when it has come back up fully. I might have gotten too used to my DSP Bighorn in the last few months. That one has a very positive feel, letting you know once the stanchion has snapped to max height. Maybe a little more air in the LEV might help but in any case this is not a problem. Just an observation here. Once up it stays up without any play. Only thing left now is the durability of the product that only time can tell...

Did some simulated "OH SH!T" moments approaching a flight of stairs fast while dropping the post at the same time. All in one quick motion and really works well with the non-stock remote... Having tried this with all my other adjustable posts with their respective stock remote-- this chimera LEV combo is by far the quickest and smoothest.

Lateral play, wiggly saddle?-- Brand new out of the box, everything is nice and tight.. Not that I would be looking forward to any of that.

The only thing nagging me now is, sorry to keep repeating-- the whole stringed up bits going into the actuation box area. Neat, yes. Longevity and durability? Remains to be seen. After looking at it in more detail the clawed piece seems a little fragile for my liking. But let's see how things hold up over time.

So much for the"pro and cons". Overall it does what it was designed to do and doing it well. A little more expensive but if you are an adjustable seatpost junkie like me, its, recommended.

UPDATE
Two rather useful and detailed videos from KS themself on the LEV is well worth watching...
INSTALLATION

MAINTENANCE


Wednesday, May 9, 2012

2012 Adjustable Seatposts Thoughts..

A whole slew of new and or improved adjustable seatpost has been hitting the market these few months.. Even the much awaited KS Lev is now out.

Firstly to touch on the 2 that solved one of the top irritating  problem in adjustable seatpost....  a fixed cable eliminating the issue of a variable length of hose that is difficult to route and causing all kinds of rubbing and bowing that necessitates tons of cable ties to keep things in place.

My hunch on the negative aspects of Crankbrothers Kronolog Telescoping Seat Post after some sneak pics by now is very much in line with many user's feedbacks from various forums. Reading between the line in this review, I reckon is subtlely worded but screaming out loud to discerning readers to  "STAY AWAY". Could just extrapolate  what further problems will develop in one of these as the wear becomes worse with prolonged usage. Looks like the Gremlin, oops I mean Joplin post saga continues....

On the other hand the KS LEV is looking as good as it is advertised to be. The intro here by KS pretty much says it all. Pics are clear and I really can't spot too many "Uh Oh" factors. Save for the fact that despite what they say it is a really simple system-- it seems to have quite a number of parts especially surrounding the swiveling mechanism for the cable. For me the less parts a moving component has, the less likelihood of problem in the long run. Still having said, this improved cabling plus a one up with the ability to locate the cable exactly where you want is a nice touch. The one thing that is not addressed is whether the closed cartridge system in the Maglev remains as difficult to access as their earlier KS posts.. As someone who doesnt rely much on others or shops, it would be much preferable having designs that were meant to be user-friendly when servicing.

What about FOX DOSS? -- that also has the cable problem "solved"? I'm not even gonna bother but it can be ogled here. The remote alone with double triggers and the described quirky method of operation is enough to put me off from ever getting one on my bike. From the pics, it reminds me of those integrated brake-shifter abomination on a commuter bike. If it was half the price they ask for- that I can understand with a highly self acclaimed fugly nutcracker but at MSRP: USD$439 !!! Yea but just DOsSS... Drop Off some Steep Sh!t on a fixed post instead.

FOX seems pretty swooned with yet another of their acronym, CTD, (Climb-Trail-Descend) on all categories of their product this year which the DOSS is also a part of. Ok Im bias as usual but really what's with their creative department in coming up with better sounding names...

Others-- well there is the post from Giant, I saw one from Da Bomb and a few unfamiliar ones from some obscure websites... but those are pretty much copies of what's already in the market with little or not enough significant improvements and or simply "off" with a casual glance.

If I can try another seatpost this year-- the option has been narrowed down to just the KS Lev.
But for now I'm pretty much happy with the DSP Bighorn... comparing apples to apples... for post with the cable routed to the top of the clamp area -- this by far really is the most solid piece I have tried till date..


Sunday, January 8, 2012

DSP Bighorn: DIY Anti-muck Guard

As mentioned in the earlier review posting, preventing mud and grit getting into the cavity of the Bighorn looks simple enough due to the shape and design of the post head.

Pic below is pretty self explanatory.
Material used: Old inner tube cut to size and a velcro (could have just use another ring cut of inner tube but I was too lazy to pull out the post to loop it through)

While it won't win any award from the Ministry of Aesthetics but everything is neatly wrapped up without any ugly bulging. Its very possible to modify the design here slightly with a groove in future generation of this post to accept a piece of soft plastic to cover up the cavity...


Raining everywhere on the island now... no better time to test out this DIY.

                                                  ...Gone RIDING 

Sun 8 Jan 
Update
Not muddy but pretty wet. Enough grit and sand was sprayed up to the seatpost. Everything looks good and well protected. No irritating bits getting in and grinding with movable parts within the cavity housing the actuation pin.
 

Friday, January 6, 2012

DSP Bighorn Adjustable Seatpost...

Package dropped......The pre-release Bighorn Adjustable Seatpost from DSP Racing is finally here and in some really impressive packaging too!

Having owned multiple  adjustment seat posts, expectation of any new adjustable post is high. It may seem to be picking bones but the cost of such components are not cheap and the smallest bit failing means a lot of annoyance and frustration when using and or dealing with warranty returns.


Initially from pictures on the website, it look like a chimera of 2 other in the market. But there are some interesting features mentioned like the "sensitive valve control" and their much highlighted saddle clamping/adjustability design that caught my attention. In any case having owned and still using the Dueler shock and their Ti springs, my expectations has been on the high side even before it arrived... a long term review of the Dueler on my EG will be done soon...

Visually...
Although some parts may look similar to some other posts in the market but on seeing the actual thing, the Bighorn is in a class of its own. A very stiff and beefy piece with a solid dust seal and yes, the much mentioned head clamp.

Massive and intricately machined to accept the actuation mechanism and lever. Once cable is tightened, nothing protrudes out of it. In this regard I already have in mind a simply mod to mud-proof the cavity without resorting to some ugly lump of anti-gunk covering.

No extra tiny bits but everything is contained within the one piece post... only need to thread the shifter cable through. No guessing and approximating how much cable is needed to get the correct tension. Very easy to install compared to other brands of hydraulic posts used.
The link between the name Bighorn and the clamp design is pretty obvious. for me,  it conjures up image of golden scarabs, pharoahs and pyramids....

Collar seal looks to be good, wider and higher than most other posts. That should help keep most of the grit and water out. Air pressure guide is included in the instruction manual. Mine came as per specifications at 100psi under ambient temperature. Stanchion size is of a slightly larger diameter compared to at least 2 other brands. I would think bigger confers more stiffness and less play over time.... but let's see.


Small attention to details are apparent. A small return spring is incorporated in the lever pushing down on the actuating mechanism. This together with the very short distance between compressing should ensure a better return even when trail condition starts getting gritty and without the benefit of any DIY mud-proofing contraptin. Some post when getting clogged suffers from the return stroke of the lever during rides. This leads to a loose tension in the lever and makes any attempt to work it not possible, something many of us have no doubt experienced.
Left: Note the return spring on right side of picture.
Right: shows how everything is contained within the recessed cavity when in position in a rather neat Tranformer-ish looking cephalic package
Remote Lever
Remote levers, from fork lock out controls to adjustable seat post has appeared in all shape and sizes. The Bighorn's thumb down "gas-pedal" design is not unique. However, machined into a small footprint, together with the ergonomics it offers, it is one of the better ones in my opinion. It can be positioned really close to the control if one so chooses. Profile wise it doesnt extend much more than the controls I'm running so there is little of any unsightly protrusion and lesser probability of knocking into it. An improvement could come in the form of a small section of flexible hose at the lever end.. this could help greatly in the cable management for some although it would probably add a few more grams.
Lever finishing is actually a light gun metal grey anodized hue. This should appeal to Hope fans that runs components of the same color.

Installation.
The  clamping on both sides are independent. As mentioned the clamps are massive which probably makes them strong but fitting to thinner racing type saddles would need a little patience, like the WTB Silverado I picked at random from my saddle bin. Not a big issue and once the rails are snapped in place, fore/ aft + tilt adjustments are super easy.

Once satisfied  just tighten both 4mm screws down good. For designs like this.. when the screws are not quite tight the saddle can be rotated almost a full 360 degrees!. This allows easy reach into the cable set screw and adjustment valve without having to dismantle everything. A big plus especially when on the trail.


Everything was ultra tight and it almost didnt budge when I tried to push the saddle down after installing!! Ok that freaked me out a little. Put my full weight and jump on it before it started working. Full compression took another few more hard ass thumping on the saddle

After this initial little episode, everything was working as it should. However judging by the looks of it, it will be at least another few hours of use before the seals and all will fully break in. Actual smoothness can only be determined then so I wont comment further.


So far everything looks good and sturdy. An adjustable post that looks to be able to take some abuse on the trail (remains to be tested for a period before I would stamp a pass on this). But all the strong beefy features makes this by far the heaviest I have weighed. The piece here, a 30.9mm size comes in 25g more than the stated weight of 605gm. Nothing I will worry unduly over if everything works well though.

+1 for the details to the finishing. Quality machining.

One last thing I wondered is whether color kits would be offered in the future... Not that the current color combo is unacceptable but having things like color kits is always a good way to sway some that matches things  right down to the last spacer on their bikes.

Its Friday evening now, so trail testing is just a few hours away...  ... ... (To Be Continued)...   ...


.....
Sat 07 Jan
Quick urban ride today as there is no time for the trails. The return on the post is fast even though its not broken in yet (as evidenced when lowering the post where it requires sitting down hard on it with my weight). The fast return speed is something I always wanted over my other hydraulic posts. On this aspect, only a mechanical dropper on another of my bike can match it so far. For those that prefer a little slower, this can probably be adjusted via the air pressure at the other end of the post.  No hiccups so far, works as it should.

Sat 08 Jan

Move it up and down a couple of hundred times... mostly loose enough now for a very smooth action. Twisted saddle forcefully enough to test for any side to side play... None.

Was gonna test the Bighorn, then keep it for another bike build and revert to another adjustable post in the meantime . But I'm liking the smooth operation of it, looks like its a stayer on the EG.

[Update] 14 Feb 2012
A little caution on the M4 clamping bolts for the rails. Use anti-seize! I would really  prefer if the design can incorporate M5 bolts instead... Its a double edge thing with anti seize- you got to check the torque more frequently as they tend to back the screw out a bit over time. In the case of M4 bolts, anyone who has experience with other components that need relatively higher torque (as in the case of the DSP post here ) would know it can be a bit finicky to deal with. Not tight enough- it slips... tightened down hard steel M4 can strip the alu thread on the component easy when taking them off and usually accompanied by that sickening "crackling" sound. I am putting attention as the screw thread built into the post itself to secure the clamps if stripped renders the whole thing useless.... the most likely solution in such a situation would be to tap a helicoil.. but I'm not sure if that is possible as the thickness and space in there might be a constraint. Ok Im just being paranoid-me as usual... always thinking of disasters before it happens..

[Update 2] 26 Feb 2012
Check the air pressure in the post...
With all the things going on, there is not much riding done over the last few weeks. Pushing it down by hand is a lot easier and I thought things have finally broken in. But in the last 2 rides I felt the return stroke of the post was not "working right"...Signifiacantly slower and sometimes it doesnt come up. Would need an additional butt thumping to get it up. In any case even if it comes back up-- it was slow and always the last bit (~1/4") would remain stuck down  and can only be lifted up by hand. Logically al lof this would point to an insufficient air pressure in the post...

Took out post today and checked the air pressure located on the bottom! Stock presta valve was not loose and it contains an o-ring but pressure has dropped to <50psi. It was set at 90+ psi after checking it on the first day and hadn't been fiddled with since.

Reset it back to 100 psi... The day one feeling with lots of resistance when pushing down by hand came back. But lowering while sitting on the bike is not an issue, although the last bit would require to drop the full weight down and release the lever fast. slow on letting go and a bit would pop right up. Return stroke on the other hand shot right back up, fast and nothing sticking this time....

Putting 2 and 2 together-- so it seems that modulating the pressure pumped in does 2 things. It gets harder to compress toward the end but a certain amount of pressure is needed to get the return stroke smooth.

The working range given for ambient temperature is between 80-120 psi. How much to pump in I believe would be dependent on rider's weight. If you are lighter-- go with the lower end, otherwise it gets really stiff towards the end of the stroke. Heavier rider would probably not have so much of an issue.

So for lighter riders, experiment with 5 psi upwards increment from an initial 80 psi to find your sweet spot for return speed and being able to comfortably compress it all the way.

Mine at riding weight of 170 lb (yup have gained a couple of pounds) is good with 90-95 psi in the post....

All in, its not a big issue. Even if there is a need to check the air pressure every couple of months, its a relatively easy and 2 min job during regular bike maintenance. Looking on the bright side-- this gives a user friendly way to tune as opposed to some other posts where the air presurre is in accessible and requires a lot more effort to take apart in the first place... nevermind about putting things back

[Update]: June 2012
No more dropping air pressure... nothing done as it operates fine. At the same time I gotten my hands on the one of the later batches spotting  a change to M5 bolts on the clamps. That pretty much solves the only thing that has been nagging at paranoid me even though the first piece didn't fail so far. Well M5 are M5-- like all my favorite trusty stems withthis size of bolt, they definitely clamp better and is easier to work with.

[Update]: May 2014
Still work like a charm.. Only needed a top up in the air chamber. Otherwise at low pressure there is a a little sag. There has always been a a tiny bit of the stanchion that can never be fully compressed (around a ~1/4"). Doesn't realy bother me as most time the drops are sufficient. This fraction of an inch "leftover" on fulll compression of the post has stayed the same even without signs of getting worse. Pretty much fit and forget... Oh from the DSP site-- looks like there is a whole range of available colors now on the newer post and other improvement as well. 


Monday, November 21, 2011

To Drop or not to Drop

Not as per what the title may suggest, that is about taking a drop. Rather its about having adjustable aka dropper seat post. Was just reading a whole slew of for vs against on adjustable seatpost.

The usual non-direct factors like weight, cost and all are muttered. Weight wise, I don't give 2 hoots since my bikes are already heavy. Cost wise, I would of course hope some day it will come down to the price of a fixed post....wishful dreaming I reckon. As for the woes of such gadgets-- let's get real, what thing in life is problem free? Have you ever seen anything that moves that gives you zero problem! Do your research and choose wisely. Not all adjustable seatpost are created equal... 

As usual the lot voting a "NO" falls into the typical "once upon a time when I first starting riding, there weren't even such things as suspension or disc brakes..." Sure, once upon a time, dinosaurs were the biggest living things on Earth. They still are from fossil records but just extinct. Nostalgia and ego at play again. Sigh....

I'm not saying there is no place for a fixed seatpost nowadays. It all depends on the kind of trail, type of riding that one does and the amount of sacrifice one is willing to take by breaking the momentum of a ride, getting down to wiggle the post up or down.

From observation, there are riders who simply put their post at some half way point. Not the lowest but not hiked up for optimal pedaling either. It does seem to work for some and generally enough to put the weight back on the steep downs. But if it means coming to a sudden big drop... I have not seen many that takes to the air, all the time, every time. Again that boils down to reducing the fun factor in a ride for me.Plus I doubt it is really fun if there are long pedaling stretch positioned in a neither here nor there position.

Locally, in Singapore, if riding typically xc fashion, with careful line choosing, there is no need at all for an adjustable post. But even on the same trails, if you want to hit it differently, going for more aggressive lines and airing some then an adjustable post would be invaluable.

As I was reading the forum thread, can't help but notice that the replies would also somehow have depended much on where the riding takes place which would have affected the views formed. If its a hard but smooth 3000 ft climb followed by a flowy and also relatively smooth descend of the same elevation, then again a fix post is sufficient.

In many places, especially temperate countries it would also be easy to spot just about the entire trail area/ ridge lines from far to make an assessment of what one is getting into even in unfamiliar trails/ mountains.

Around South East Asia, not so... ridgelines are mostly covered in foliage and on a seemingly long descend, 2 seconds into a turn you may just find yourself powering up on a pedaling stretch, be it steep or gradual. This is where an adjustable post comes in handy. Of course one could always stand up and power up the climb but just try doing that continuously on non smooth rolling terrain with ruts rocks and what not-- it would be apparent soon enough it ain't much fun when the quads are burning from all the unneeded strains.

Add to it if its just after a rainy session, all the slipping and sliding from a lack of traction...... An adjustable post can quickly put you back into an efficient seated climb without getting off the bike. Crest over and u are ready for the next 1km of bombing down.

Then there are other occasions when u suddenly need to drop the post. Again the "high fixed seatpost" championing folks would wax from the glory of their yesteryear riding. Seriously, beer bragging macho sessions or engaging in trailhead bravado decked out in rainbow colorsand finally going home with a squeaky clean bike isn't my cuppa. I'm already too underskilled and getting too old. Time is better spent trying to ride as much with components that works and brings improvement to riding that I do.

Just an example from a recent trip/ride...  on a descending but almost flat section, to gain max speed, had the seatpost on the high side (not optimal climbing height but still high enough) then all of a sudden came sections like this... almost vertical roll down and a quick flick got me down and going again. A fixed post? Nah....


Saturday, October 30, 2010

KS i950r-Adj.Seatpost

Scored and scarred my Kind Shock i900 was still performing pretty well. A change of stanchion shortly after it was used didn't stop the scratch problem from coming back but it's been more than a year now...it seems the newer KS post have been sorted out.

Fought the urge all these while to go back with a remote lever because of the extra cabling and certainly it doesn't score in the looks department which was definitely the case with another post in my inventory, the Gravity Dropper.

However, truth is that for a good number of occasions, with one hand reaching under the seat to grab the lever to adjust saddle height and missing a pedal stroke, it gets pretty annoying. Though it has become second nature but I couldnt help thinking how much more smoothly some things could be cleared if the hand action hasn't cause a pause and impeded the riding flow.


Finally, went over to Eugene at GHC today. Sure enough trust him to dig out a piece of KS i950r. Just had to make sure it wasn't the first generation with setback and cable running down the front but the newer ones where cabling is directed in the rear.


One glance, it is telling that the company has listened to users feedback and improve on subsequent development. I was a little skeptical initially, it was during the time when the rage of adjustable seatposts was dominated by the other brands and Crankbrothers started their bling but less than stellar Joplin line...and here was this small company out of Taiwan that most folks have not heard of.


One of the feedback on the earlier models was the single bolt seatclamp and I believe a number has also resulted in bent rails when saddles were clamped further back. Certainly the case with mine...so bad was the bent that I eventually had to have my favourite saddle replaced.

It can be seen here how the lower clamping plate is extended, to help support the weight. Given that this one now has no setback, all the more important as many folks would have to shift the saddle rearwards.

After removing everything, thinking it was better to have more clearance to fit and tighten up the cable, it stumped me a good 5 minutes when trying to put the bolts back. Realized eventually that the screw thread were not perpendicular like usual. Rather they were cut at an angle. Easy enough after this was figured out.


A side by side comparion of old and new. The extended lower clamping plate compensates for the distance lost in the setback version in terms of where the rails are clamped. I ended up pretty much at the same marking as before and latched the bolts tight. Note the extra length of clamping area and support in the i950r vs the old i900


Tightening the clamp pieces down to the head of the post was a little sketchy. Partially due to the rather fine serrations, it takes a bit of feel to make sure the whole thing is secured. With such design that relies on grooves on both sides, it is important to get them truly interlocking, otherwise things can easily grind down and in this case, it will be nothing more than an uber expensive paperweight at the end of the day.

Shouldnt have worried about tightening the cable tension and had everything removed initially. Again I have not read the provided manual. Really its a well illustrated and helpful guide just like they did with the first generations of the KS posts.

What really mattered was to have the set screw tightened at the cable guide where the cable housing ends. The other was a black set screw locked directly onto the inner shifter cable and hooked over to the red lever. Trick is to pull the lever down slightly and move the set screw piece over and making sure when the remote is depressed, the lever is almost touching the cable guide below. Otherwise the piston inside will not be depressed sufficiently for the post to move down/up. Fine tuning of the length of exposed inner cable between these 2 would adjust how fast the post rebound/ uncompress.

One problem immediately was observed after the cables were nice and snugly in place. Remembering how the cavity where the i900 lever moves in gets clogged up with dirt and mud making adjustments sometimes a little stiff, now the cavity was facing rearward! In this monsoon period, I can just imagine how all the dirt and grime will be finding new home after every ride...and certainly having to clean it out each time would get me bitching after a long day of ridng.

Ok coming from me, its easy to guess. Yup, inner tubing to the rescue again. Cut just enough to cover the cavity and punch it through the lever and put the cable back on.


Scale matters...
Things that make weenies wince. Weight! Less the remote and cable, both posts are virtually the same.


The Remote...
Here comes my next headache... current bling PDW grips doesnt have the usual lock ring end that the KS remote could fit into. My first thought was good ol' inner tubings again! Cut and shimmed to hold the lock ring lever in place. Or simply acquiesce and go back to my old ODI Rogues.  Oh wait... almost forgot the adjustable Bricko grip. Using the first piece that attaches to the lock ring.. a neat solution was staring back at me. Ain't it just great when one's house is filled with all kinds of weird bike bits!


This is how the finished assembly looks on the handlebar.


Cable is a little too long.. but its 4 a.m.... [to be continued]

The Test...
Sun 31 Oct... 3pm after a heavy lunch of sesame chicken and meatballs, post was put to the test. Found myself doing the hands-beneath-the-saddle out of instinct from the old i900 post. But 2 km later...all was ingrained as my thumb got "imprinted" to the remote lever.

It paid off to pay attention when installing... can't complain about the functionality at all on the i950r. There is the all familiar stiction of a new stanchion but at full depression, the post springs up with no hesitation. Rate can be controlled by half depressing the remote. The action not unfamiliar to that of driving a manual car and controlling the clutch.

No wobble or no lateral play. with post down, holding it up by the saddle and moving it around a bit did not raise the post up. But when hooked over the shoulder and carried the bike up some stairs-- it did move up halfway while trudging on those steps. I'm guessing the entire bike weight was just a tad too much for the post to hold down. Nothing major. Will see if this gets "looser" and the post will slip up easier after a few more rides.

Did the little DIY rubber flap covering the cavity where the lever on the post moves to actuate the inner piston work? Yup it did. All the wet soil and sand that was thrown up was left on the outside. Depressing the remote a few times at the end of ride was smooth-- no gritty feeling on the lever at the post end.

June 2011:  Short update... so far all the maintenance done was only wipe down and packing grease under the master bushing and red collar.. No full strip down as post is working really smooth. Minor tightening of cable on  a couple occasions at set screw to get the rebound back to speed. Remote lever took some beating but seems to still hold up well enough.


Friday, April 30, 2010

Maintenance...KS900

Just found another article where a much better maintenance guide and info on the KS post was done


Did this sometime back...

This is my second adjustable seatpost. Had the reported issue like many with the scratched stanchion. It was sent back to the manufacturer in Taiwan and came back with a new stanchion. But things didn't last long before the scratches started appearing again.

This time I notice that the marks became worse as the post gets drier. It was said to be due to the master bushing (roller bearing according to the manual). Definitely the roller bearings are hitting on the stanchions but not having lubrication sure aggravated the problem. Lastly I guess it also depends a lot on the seat tube angle. The slacker and the more pointed upward the seat is, probably the greater the issue as with all kinds of adjustable seat posts.


The other problem that started appearing as the lubrication disappeared from the stanchion after some usage time after a rebuild/relubing of internals was a slight lateral play. Nothing major and certainly not like the kind of slop found on Joplins.


Better to strip everything down and check again.


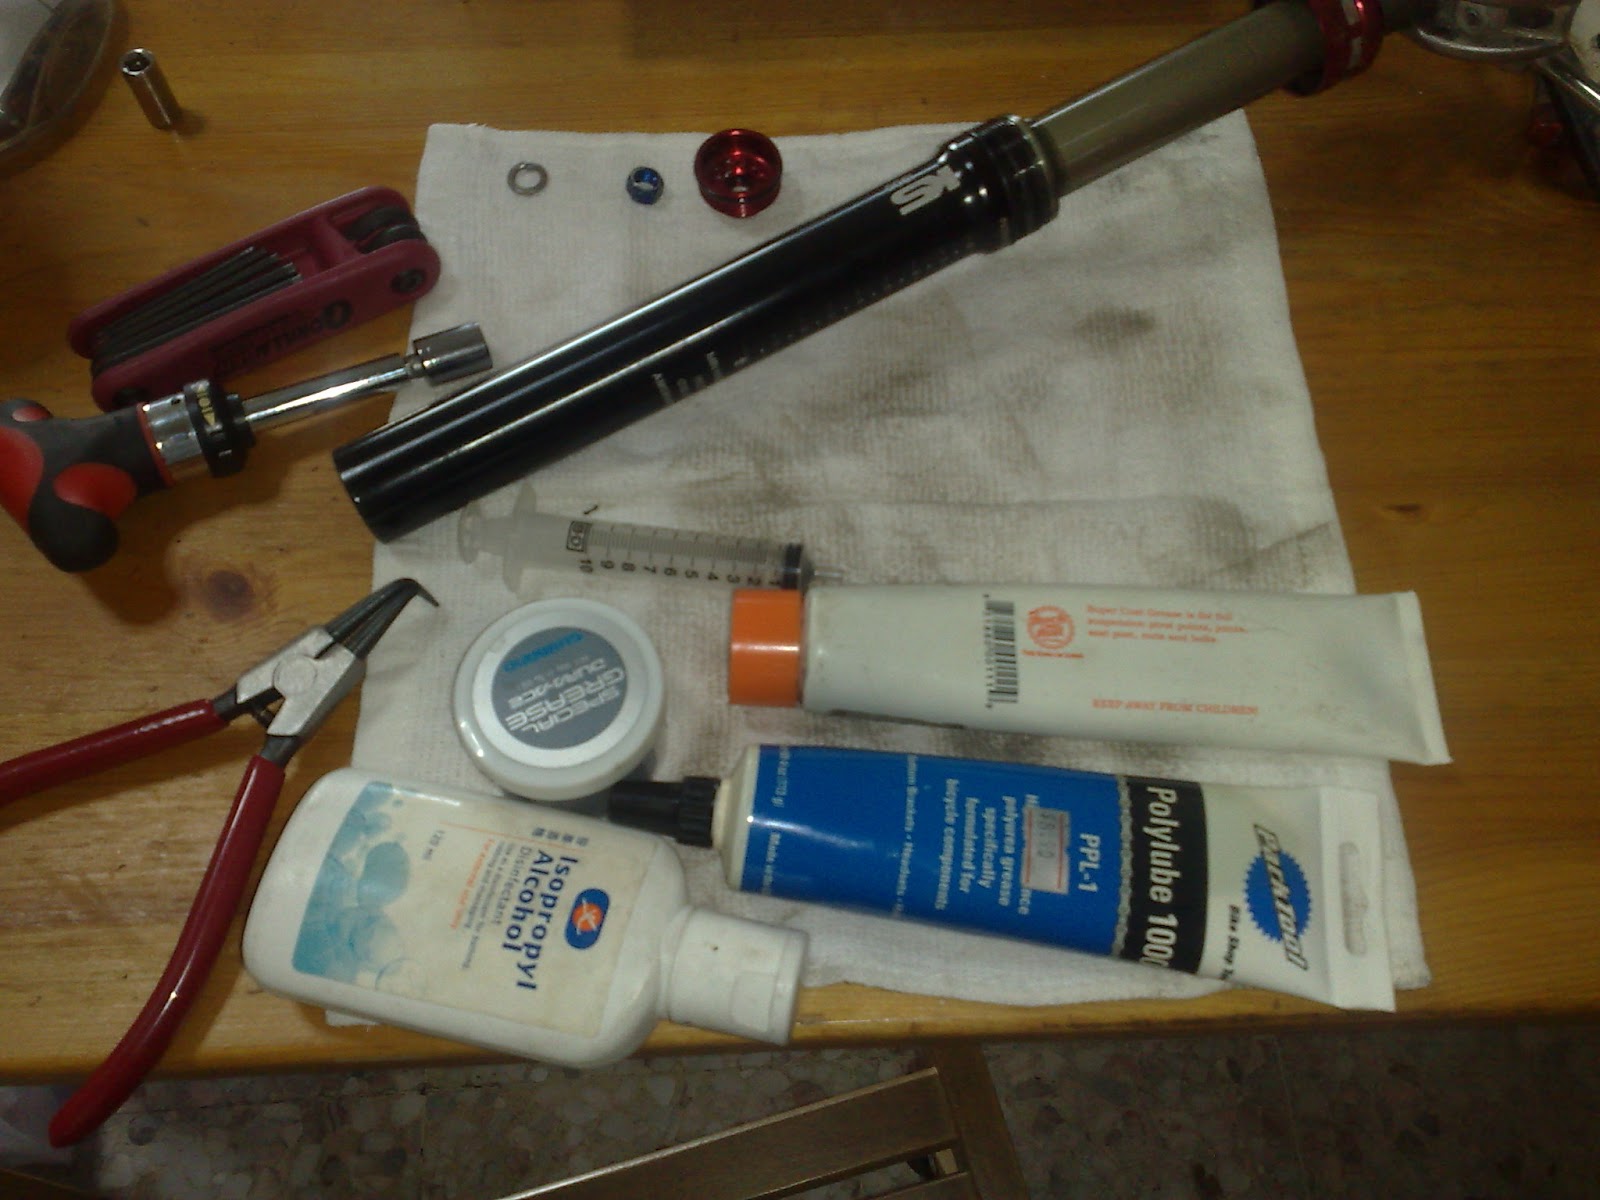
Simple enough with a socket wrench and circlip plier and following the in structions on the booklet. While I already noted that the outside of the stanchion was dry and causes some sticking when trying to move the post, first thing noted after stripping was the lack of any oil left inside the stanchion and that is probably part of  the cause of the stickiness as well.

I substituted the recommended 20-30 weight oil with some lubrication for 2-stroke engines.. dunno what they are actually called. Just jet 25ml and took a gamble it wouldn't screw up the o-ring seals (so far all seems ok after a couple of months).

Examined the scratches and determine that apart from being fugly, no harm done. Any prolong dry scratching might eventually crack of pieces of the anodizing around the scratches but with periodic lubing of the roller bearing from the inside should make this post last for awhile.
 
Put everything back in reverse order. Remember to tighten down the retaining nut at the bottom properly with a socket wrench and ensure the red anodized ring on top is not too loose. Otherwise both will lead to the seatpost being able to be pulled up even if lever is not depressed.

Scratch or not, thing is smooth as silk.