an(e)vil

My photo
Existentialism-- Just a bloody good excuse to go riding...
Showing posts with label installation. Show all posts

Tuesday, September 11, 2012

its fork and f@^k

A new CSU spotting additional 10mm travel and a refined crown, some weird colored lowers with the fork's original 2010 cartridges. That's my rebuilt '2010' Vengeance HLR. 

Interesting?  But really this was a result of one woe after another in what was supposed to be a simple part replacement +  normal rebuild event. Well the bonus is I now have a somewhat "80% brand new" fork and learnt a few other things about fork maintenance.

Creaky CSU after 1+ yr of usage warrantied, no questions asked.

Stanchions not moving smooth after reinstalling-- initially thought it might be some vacuum... Troubleshooting the rebuild,  seems like the old lower's alignment is off. 

Yup its probably a little crude but free the uppers,  drop the axle and see if it goes through both legs of the lowers for the alignment check.

Apparently not and the fact that I could then twist it by hand until things align wasn't very reassuring.
Actually at that point I was mumbling to meself.. "Yea this is pretty much f^%ked". Leaves me wondering if the creak was really due to the fork uppers.....

Luckily somebody have spare lowers hanging around. Hell yea its good to have friends, save me more waiting time to order from the factory.. and this one probably meant to go with a  Specialized Status.

Well, here we go again.. *disassembly* >>> *assembly*  for probably the 50th bloody time within a week...

Yup, previously mentioned on how stiff and all the fork is ... so what could have happened?...  Given how the bike gets thrown when I bail plus a few really hard falls taken with the front bearing most of the brunt... I still say it is pretty strong after all my crash-test-dummy antics spanning from Singapore to Thailand in the past ~2 years. Wouldn't blame the design or manufacturer for the multiple bendosis state of the lowers.. 

Fate of the old lowers?...hmmm maybe some "light saber" stanchions in there and hang up in the bike room as functional art providing some extra lumens when wrenching.


Things noted...

The sealed cartridge damper can take between 70-85ml of fork fluid. Recommended factory oil change is 70-75 ml with 7.5wt oil. But last week Dirty had his paws all over the damper and put in 10wt filled to the max 85ml. The verdict now from compressing the fork is that its over damped and feeling rather progressive. That wouldnt be too much of a problem as intended build of bike would run great with a stiffer front.

But oil weight/ volume probably are affecting the rebound rate... too slow even when ramped to fastest setting. The reported squishing/cavitation as some users has mentioned is likely caused by the oil volume..if it isnt filled to the max then probably that's where it comes from as the damper rod is cycled.

Going by all things observed, less oil would probably means stroke action is likely more linear but starting stroke might need to add a little more low comp to offset. Ok all these just means more mucking around with the damper unit next time.

Frankly when the old oil was first poured, I didn't think it needed to be changed but of course one can't tell how much the oil would have degraded from just the eyeball-o-meter.


The fastest way to drop the number of max clicks ~15 of your hi-comp is to install the gold ano knob in reverse. Stupid me.. luckily no damage done to this rather delicate portion of the fork. Easily rectified once you realize what's the problem.

If some black plastic washer drops out along the way (~10mm diameter) seemingly out of nowhere -- fret not, check the 2 respective nuts (as pointed by red arrows in pic below) meant to tighten down and hold down each end of your fork.

In both, underside of the nuts has a  recess for this black spacer. Just press it back in. BTW a rebuild kit should come with these new spacers... these I think are meant to be replaced and seal the hole area on the bottom end of lowers to prevent fluids (~15-20ml) in the open bath from dripping out. My old ones looks ok -- so being cheap I'm saving the new ones for future rebuilds.

DON'T skim on the 15-20ml oil to be poured into the lowers. The fork is not going to work right without it (update on 4 Oct 2012)




Thursday, March 31, 2011

Changes

Time to dust off the Soma... and make a few long overdue swaps. Back to the Nitto Randonneur. Monster 62t ring swapped to a spanking new and shiny 53t salsa. Rear has gone back to a 16t WI. Gonna miss the feel of the 18t trials freewheel :( Not much of a choice...ratio on the 18 with a 53 just overspin too much on the generally flat terrain around Coastal on those night rides. Need the most optimal gear-ratio if I hope to catch up with the bunch that's just gone faster these days.


EG is up for some changes too.. A Vector HLR rear doesnt seem to be materializing. Decided on a Dueler instead. While waiting for the piece to arrive....meantime slap on a t-loan and gonna test out both the 400 and 450 lb spring I have with me this Sat.  Thot the DHX was "perfect"-- not so sure now after  a cursory ride on the Dueler tonight. But not making any hasty decision, only a few proper trail rides later will tell.... oh please fast forward to Saturday.


No more ugly blue ano knobs, piggy cylinders or other stray ano hues Finally a true black-silver steed with just a minute amount of red accented bits spread out in the right places.


Jul 2011... back to the SOMA tweaks... lesson from the EG = reduce reach. I really just am not so lanky and tall!  Tange zero setback post. Nice blingy bling


Saturday, October 30, 2010

KS i950r-Adj.Seatpost

Scored and scarred my Kind Shock i900 was still performing pretty well. A change of stanchion shortly after it was used didn't stop the scratch problem from coming back but it's been more than a year now...it seems the newer KS post have been sorted out.

Fought the urge all these while to go back with a remote lever because of the extra cabling and certainly it doesn't score in the looks department which was definitely the case with another post in my inventory, the Gravity Dropper.

However, truth is that for a good number of occasions, with one hand reaching under the seat to grab the lever to adjust saddle height and missing a pedal stroke, it gets pretty annoying. Though it has become second nature but I couldnt help thinking how much more smoothly some things could be cleared if the hand action hasn't cause a pause and impeded the riding flow.


Finally, went over to Eugene at GHC today. Sure enough trust him to dig out a piece of KS i950r. Just had to make sure it wasn't the first generation with setback and cable running down the front but the newer ones where cabling is directed in the rear.


One glance, it is telling that the company has listened to users feedback and improve on subsequent development. I was a little skeptical initially, it was during the time when the rage of adjustable seatposts was dominated by the other brands and Crankbrothers started their bling but less than stellar Joplin line...and here was this small company out of Taiwan that most folks have not heard of.


One of the feedback on the earlier models was the single bolt seatclamp and I believe a number has also resulted in bent rails when saddles were clamped further back. Certainly the case with mine...so bad was the bent that I eventually had to have my favourite saddle replaced.

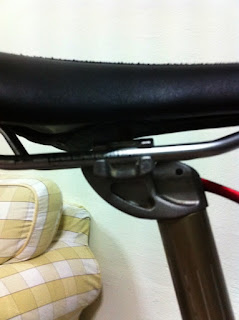
It can be seen here how the lower clamping plate is extended, to help support the weight. Given that this one now has no setback, all the more important as many folks would have to shift the saddle rearwards.

After removing everything, thinking it was better to have more clearance to fit and tighten up the cable, it stumped me a good 5 minutes when trying to put the bolts back. Realized eventually that the screw thread were not perpendicular like usual. Rather they were cut at an angle. Easy enough after this was figured out.


A side by side comparion of old and new. The extended lower clamping plate compensates for the distance lost in the setback version in terms of where the rails are clamped. I ended up pretty much at the same marking as before and latched the bolts tight. Note the extra length of clamping area and support in the i950r vs the old i900


Tightening the clamp pieces down to the head of the post was a little sketchy. Partially due to the rather fine serrations, it takes a bit of feel to make sure the whole thing is secured. With such design that relies on grooves on both sides, it is important to get them truly interlocking, otherwise things can easily grind down and in this case, it will be nothing more than an uber expensive paperweight at the end of the day.

Shouldnt have worried about tightening the cable tension and had everything removed initially. Again I have not read the provided manual. Really its a well illustrated and helpful guide just like they did with the first generations of the KS posts.

What really mattered was to have the set screw tightened at the cable guide where the cable housing ends. The other was a black set screw locked directly onto the inner shifter cable and hooked over to the red lever. Trick is to pull the lever down slightly and move the set screw piece over and making sure when the remote is depressed, the lever is almost touching the cable guide below. Otherwise the piston inside will not be depressed sufficiently for the post to move down/up. Fine tuning of the length of exposed inner cable between these 2 would adjust how fast the post rebound/ uncompress.

One problem immediately was observed after the cables were nice and snugly in place. Remembering how the cavity where the i900 lever moves in gets clogged up with dirt and mud making adjustments sometimes a little stiff, now the cavity was facing rearward! In this monsoon period, I can just imagine how all the dirt and grime will be finding new home after every ride...and certainly having to clean it out each time would get me bitching after a long day of ridng.

Ok coming from me, its easy to guess. Yup, inner tubing to the rescue again. Cut just enough to cover the cavity and punch it through the lever and put the cable back on.


Scale matters...
Things that make weenies wince. Weight! Less the remote and cable, both posts are virtually the same.


The Remote...
Here comes my next headache... current bling PDW grips doesnt have the usual lock ring end that the KS remote could fit into. My first thought was good ol' inner tubings again! Cut and shimmed to hold the lock ring lever in place. Or simply acquiesce and go back to my old ODI Rogues.  Oh wait... almost forgot the adjustable Bricko grip. Using the first piece that attaches to the lock ring.. a neat solution was staring back at me. Ain't it just great when one's house is filled with all kinds of weird bike bits!


This is how the finished assembly looks on the handlebar.


Cable is a little too long.. but its 4 a.m.... [to be continued]

The Test...
Sun 31 Oct... 3pm after a heavy lunch of sesame chicken and meatballs, post was put to the test. Found myself doing the hands-beneath-the-saddle out of instinct from the old i900 post. But 2 km later...all was ingrained as my thumb got "imprinted" to the remote lever.

It paid off to pay attention when installing... can't complain about the functionality at all on the i950r. There is the all familiar stiction of a new stanchion but at full depression, the post springs up with no hesitation. Rate can be controlled by half depressing the remote. The action not unfamiliar to that of driving a manual car and controlling the clutch.

No wobble or no lateral play. with post down, holding it up by the saddle and moving it around a bit did not raise the post up. But when hooked over the shoulder and carried the bike up some stairs-- it did move up halfway while trudging on those steps. I'm guessing the entire bike weight was just a tad too much for the post to hold down. Nothing major. Will see if this gets "looser" and the post will slip up easier after a few more rides.

Did the little DIY rubber flap covering the cavity where the lever on the post moves to actuate the inner piston work? Yup it did. All the wet soil and sand that was thrown up was left on the outside. Depressing the remote a few times at the end of ride was smooth-- no gritty feeling on the lever at the post end.

June 2011:  Short update... so far all the maintenance done was only wipe down and packing grease under the master bushing and red collar.. No full strip down as post is working really smooth. Minor tightening of cable on  a couple occasions at set screw to get the rebound back to speed. Remote lever took some beating but seems to still hold up well enough.